Мицрософт Едге је веб прегледач који је развио Мицрософт. Укључен је у Виндовс као подразумевани прегледач који замењује Интернет Екплорер. Лакши је и има више функција у односу на Интернет Екплорер, попут интеграције са Цортаном и читања бележака итд.
Недавно, након ажурирања оперативног система Виндовс 10, многи корисници су пријавили да Едге није успео да се покрене и наставио је да се искључује без икаквих упита. Разлога за ово питање може бити много. Покрените решења одозго и крените низбрдо.
Напомена: Рубови ивица након ажурирања програма Фалл Цреаторс (1709) наведени су на крају чланка.
Решење 1: Чисто покретање рачунара
Ако први пут имате проблем са Мицрософт Едге, препоручује се поновно покретање рачунара. Ако то не донесе побољшање, можемо испробати Цлеан Боотинг. Ово покретање омогућава рачунару да се укључи са минималним скупом управљачких програма и програма. Омогућене су само оне основне, док су све остале услуге онемогућене.
- Притисните Виндовс + Р да бисте покренули апликацију Покрени. У дијалошки оквир унесите „ мсцонфиг “ и притисните Ентер.

- Дођите до картице Услуге на врху екрана. Означите ред који каже „ Сакриј све Мицрософт услуге “. Једном када кликнете на ово, све повезане услуге са Мицрософтом биће онемогућене, а иза њих ће остати све независне услуге.
- Сада кликните на дугме „ Онемогући све “ на дну са леве стране прозора. Све независне услуге сада ће бити онемогућене.
- Кликните на Примени да бисте сачували промене и изашли.

- Сада идите на картицу Стартуп и кликните опцију „ Опен Таск Манагер “. Бићете преусмерени на менаџер задатака где ће бити наведене све апликације / услуге које се покрећу приликом покретања рачунара.

- Изаберите сваку услугу једну по једну и кликните на „ Онемогући “ у доњој десној страни прозора.

- Сада поново покрените рачунар и проверите да ли се Едге успешно покреће. Ако се то догоди, значи да је узрок проблема био спољни програм. Претражите инсталиране програме и утврдите која апликација узрокује ваше проблеме.
Solution 2: Disabling Trusteer Rapport
Trusteer Rapport is a security software designed to protect confidential data from malware and phishing. It has intensive anti-phishing methods implemented and it protects users from almost all kinds of attacks. It immediately alerts suspicious activities and always makes sure that the website is safe before you enter your credentials.
It seems that after the Windows update, Trusteer Rapport started conflicting with Microsoft Edge. Its “Early Browser Protection” policy somehow conflicts with Edge and doesn’t allow it to start. We can change the policy or disable Trusteer Rapport and check if Edge works as expected.
- Press Windows + S to launch the search bar of your start menu and type “Trusteer”. Select the “Trusteer Endpoint Protection Console” option which returns as a result and open it.
- Once the console is launched, click on the green arrow present at the bottom right side of the screen. You will be navigated to the next page.

- Now click on “Edit Policy” present under the tab of Security Policy present at the top left side of the screen.

- Now you will be given a captcha to ensure that you are a human. Enter the letters as given and press Ok to proceed.
- A new window will pop up consisting of all the security policies of the application. Browse through them until you find the entry “Early Browser Protection”. Click on the drop-down menu and select “Never” from the list of options available.

- Press Save to implement all your changes and exit. Restart your computer and check if Edge performs as expected.
Note: You can try uninstalling Trusteer Rapport if changing the policy doesn’t work. It is strongly advised that you check your edge after uninstalling Trusteer before proceeding with the following solutions.
Solution 3: Running System File Checker
System File Checker (SFC) is a utility present in Microsoft Windows which allows the users to scan their computers for corrupt files in their operating system. This tool has been there in Microsoft Windows since Windows 98. It is a very useful tool for diagnosing the problem and checking if any problem is due to corrupt files in windows.
We can try running SFC and see if your problem gets solved. You will get one of the three responses when running SFC.
- Windows didn’t find any integrity violations
- Windows Resource Protection found corrupt files and repaired them
- Windows Resource Protection found corrupt files but was unable to fix some (or all) of them
- Press Windows + R to launch the Run application. Type “taskmgr” in the dialogue box and hit Enter to launch your computer’s task manager.
- Now click on File option present at the top left side of the window and select “Run new task” from the list of options available.

- Now type “powershell” in the dialogue box and check the option underneath which states “Create this task with administrative privileges”.

- Once in the Windows Powershell, type “sfc /scannow” and hit Enter. This process may take some time as your entire Windows files are being scanned by the computer and being checked for corrupt phases.

- If you encounter an error where Windows states that it found some error but was unable to fix them, you should type “DISM /Online /Cleanup-Image /RestoreHealth” in the PowerShell. This will download the corrupt files from the Windows update servers and replace the corrupt ones. Do note that this process can also consume some time according to your internet connection. Don’t cancel at any stage and let it run.
If an error was detected and was fixed using the above methods, restart your computer and check if the taskbar started working normally.
Solution 4: Reinstalling Edge
If the repairing of Microsoft Edge doesn’t work, we can try reinstalling it. Since Edge is installed by default on Windows 10, it cannot be uninstalled using the conventional method we use for other applications. We have to navigate to the file location of Edge, take ownership, and deleting the folders. Then we can install Edge again using Powershell.
- Press Windows + R to launch the Run application. Type “C:\Users\%username%\AppData\Local\Packages\Microsoft.MicrosoftEdge_8wekyb3d8bbwe” in the dialogue box and press Enter to navigate to the file location.
- Once in the file location, navigate back to Packages and takeownership of the folder we just accessed. Follow the steps on how to take ownership of folders using this guide.

- Once you have ownership, you can easily delete all the folders. This will uninstall Microsoft Edge.

- Now press Windows + S to launch the search menu and type “Powershell” in the dialogue box. Right click on the first result and select Run as administrator.
- Now type the following command in the console and press Enter. The process might take a while as this command tries to install all the default applications which are present when you install a new version of Windows 10. Be patient and let the process complete.
Get-AppXPackage -AllUsers -Name Microsoft.MicrosoftEdge | Foreach {Add-AppxPackage -DisableDevelopmentMode -Register "$($_.InstallLocation)\AppXManifest.xml" -Verbose}
- Now restart your computer and check if Microsoft Edge works.
Solution 4: Changing the Group Policy (Post 1709 Update)
The solutions listed below are written for post-1709 (Creators Fall Update) which caused a lot of problems for edge users.
Another aspect that seems to conflict with the Edge browser was the GPO settings regarding “Allow extensions”. It seems that after the update, this setting is not configured properly and causes Edge to crash randomly. We can try editing the policy and check if this fixes anything.
- Press Windows + R to launch the Run application. Type “gpedit.msc” in the dialogue box and press Enter.
- Once in the Group Policy Editor, navigate to the following path:
Computer Configuration > Administrative Templates > Windows Components > Microsoft Edge
- Look for the policy named “Allow Extensions” present at the right side of the window. Double-click it to change its settings.

- Change the policy setting to “Not Configured”. Press Ok to save changes and restart your computer. Check if Edge started working as expected.

Solution 5: Editing the Registry (Post 1709 Update)
Another workaround for the same problem (Allow extensions) is to edit the registry. This solution is recommended for users who don’t have GPE installed on their machines. This will perform the same functionality as the previous solution. However, you can still give it a shot of the previous one didn’t work.
- Press Windows + R to launch the Run application. Type “regedit” in the dialogue box and press Enter.
- Once in the registry editor, navigate to the following file path:
HKEY_LOCAL_MACHINE\SOFTWARE\Policies\Microsoft\MicrosoftEdge\Extensions
- At the right side of the screen, you will see an entry “Extensions Enabled” with the DWORD value most probably “00000000”. Double-click it and change its value to “1”.
You can even delete the registry value after backing it up by right-clicking the “MicrosoftEdge” folder (at the navigation panel at the left side of the window) and selecting “Export”. This way you can always revert changes if things don’t go as expected.

- Restart your computer after applying the changes and check if this solves the problem at hand.
Solution 6: Adding a Registry Key using Command Prompt (Elevated) (Post 1709 Update)
If all the above solutions don’t work, we can try adding a key using an elevated command prompt into your registry. Do note that this process requires administrator account so don’t try executing it in a limited one. We will add a registry key to users in this method. Make sure to backup or create a restore point before attempting this method. If things don’t work out, you can easily restore the previously saved session of your OS.
- Press Windows + S to launch the Search bar. Type “command prompt” in the dialogue box, right-click on the result and select “Run as administrator”.
- Once at the command prompt, execute the following instruction:
reg add “HKCU\Software\Microsoft\Internet Explorer\Spartan” /v RAC_LaunchFlags /t REG_DWORD /d 1 /f

- Restart your computer and check if the problem got solved.
Solution 7: Resetting Edge Settings
Another thing to try before we move on to more technical and tedious solutions is resetting Edge settings completely. There are numerous instances where because of some minor problems or technicalities, Edge doesn’t open as expected.
The settings are mostly internal and get initialized automatically. These settings may sometimes have some bad configurations which might be conflicting internally. You can easily reset Edge settings using the steps below:
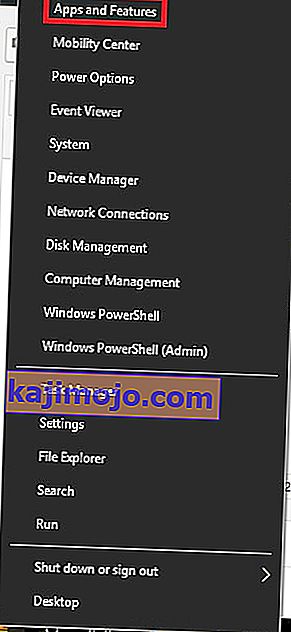
- Right-click on the Start menu and then select Apps and Features.
- Now, click on Microsoft Edge and then select Advanced options.
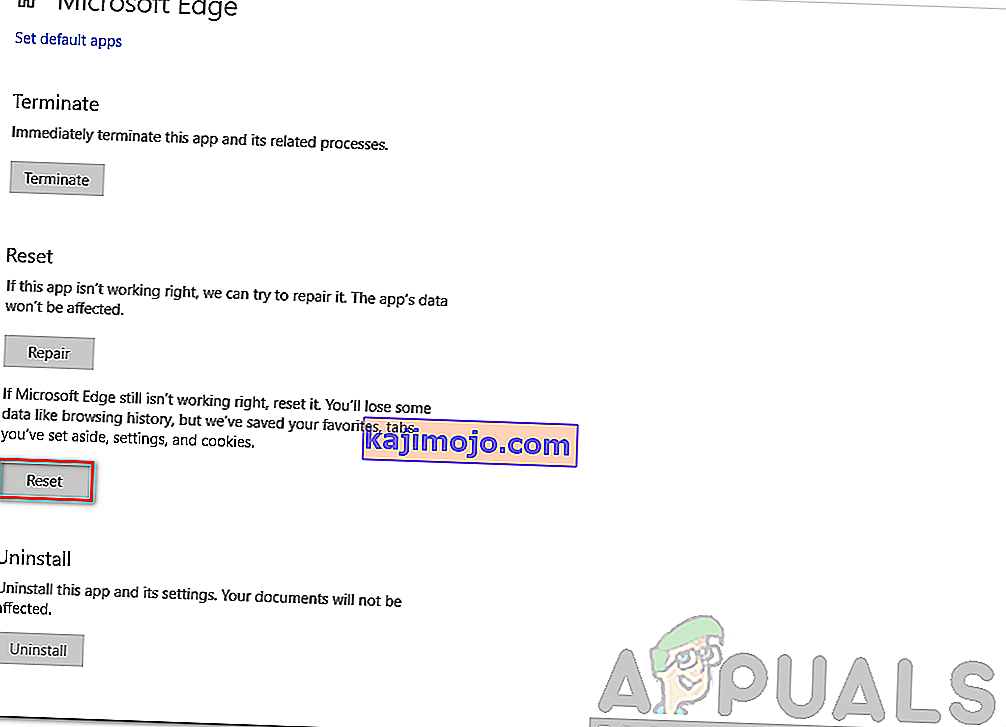
- Click on Reset.
- Restart your computer completely and then check if the issue is resolved for good.


Solution 8: Power-cycling your Computer
Another thing to try is power cycling your computer completely. Power cycling is an act in which you completely restart your computer by removing the power cord as well. This will remove all the temporary settings that your operating system has stored and will reinitialize them. If Edge is not opening because of this, it will be fixed.

Save all your work and shut down your computer. Now, take out the power cord from your PC or the battery from your laptop. Press and hold the power button for about 15 seconds before starting your computer again and checking if the issue is resolved and you can use Edge properly.
Solution 9: Creating a new User Account
Another thing which we can try is creating a new user account in your computer. Every Microsoft service is connected to the account you are accessing it with. Its configurations and preferences are bound to the local account. Here, if you have issues with your user account, it can cause Edge not to start as expected.
After creating a new user account, restart your computer and log into it and check if Edge works properly.
Solution 10: Reinstall Windows
If none of the above methods work, we can consider reinstalling Windows completely. Edge is pre-installed in Windows and when you reinstall it, everything gets refreshed and gets reinitialized as well. This will erase all your System drive files so make sure you backup all your preferences and other data before proceeding.
After repair installing Windows, log into your new account and enjoy Edge. You can restore your data back after you verify that Edge is working as expected.