Стеам Цлоуд пружа једноставан и транспарентан начин за чување података о играма на удаљеном систему за складиштење. Датотеке наведене у конфигурацији Ауто-Цлоуд или ако су записане на диск аутоматски ће се реплицирати на Стеам сервере у облаку (користећи Цлоуд АПИ) након што игра постоји.

Ово је посебно корисно ако корисник промени свој рачунар. Напредак игре наставиће Цлоуд Цлоуд или читање директно са диска. Датотеке ће се аутоматски преузети пре покретања игре, јер бисте већ унели Стеам акредитиве. Главни посао Стеам Цлоуд-а је да обезбеди синхронизацију свих датотека на свим рачунарима које корисник користи.
Корисници имају могућност да онемогуће целокупну синхронизацију у облаку присутну у Стеам подешавањима на клијенту. Корисници такође имају флексибилност да онемогуће Цлоуд синхронизацију по игри. Пре него што наставите са решењима, ажурирајте Стеам клијент на најновију верзију.
Који су различити начини коришћења облака паре?
Стеам нуди две различите методе за коришћење Стеам Цлоуд-а.
Прво је Стеам Цлоуд АПИ. Цлоуд АПИ пружа низ функција које вам омогућавају да директно интегришете Стеам Цлоуд у своју игру. Цлоуд АПИ такође обавља задатак изоловања појединачних Стеам корисничких датотека једни од других и такође пружа бољу контролу над Стеам Цлоуд-ом у целини.
Други је Стеам Ауто-Цлоуд. Ова функција је првенствено дизајнирана за старе игре у којима је било тешко користити Цлоуд АПИ. То је брз начин да започнете са Стеам Цлоуд-ом, али му недостају флексибилност и снага коју пружа Стеам Цлоуд АПИ.
Програмери препоручују употребу Цлоуд АПИ-а уместо Стеам Ауто-Цлоуд-а, јер пружа дубљу и ефикаснију интеграцију и прилагођавање. Омогућава вам да на најбољи начин искористите Стеам облак.
Како да решим сукоб у Стеам Цлоуд-у?
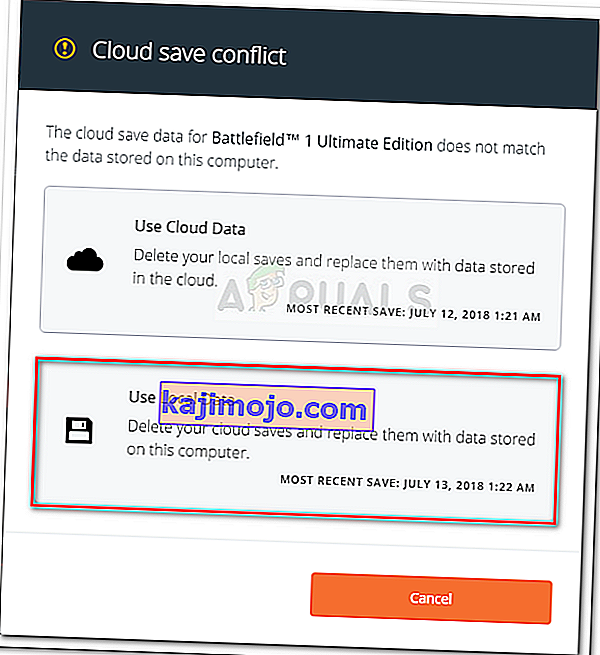
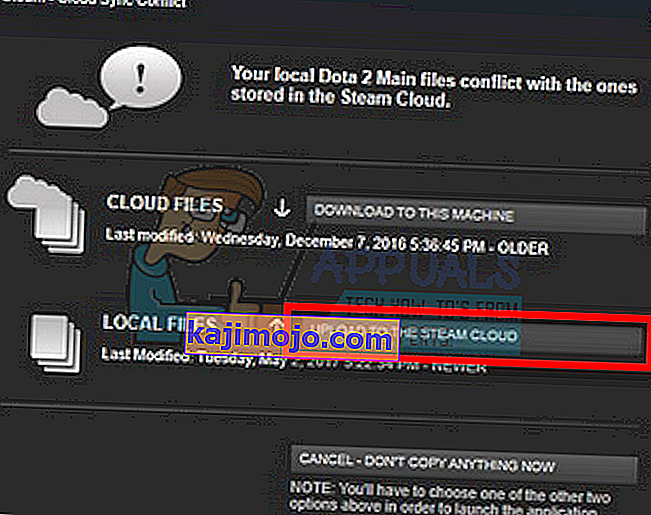
До сукоба у Стеам Цлоуд-у долази када се садржај Стеам Цлоуд-а не подудара са локалним датотекама игара сачуваним на вашем чврстом диску. То се може догодити на машини коју сте користили у то време или се можда већ дешавало на другој машини. Будући да је датотека измењена на две различите локације без међусобне синхронизације, Стеам не може одредити коју датотеку ће задржати.

Највероватније ћете одабрати датотеку која је последње измењена. Што значи да ће најновији догађаји у вашој игри бити сачувани. Требали бисте пажљиво прегледати податке прегледане у прозору. Пажљиво прегледајте датум и време контекста и прилагодите ово последњем игрању игре на Стеаму. Овај контекст вам може помоћи у одређивању верзије коју ћете задржати.
Имајте на уму да ће играње игара у офлајн режиму спречити синхронизацију игара и ово је највероватнији узрок сукоба Стеам Цлоуд-а.
Шта ако Стеам не може да синхронизује датотеке са облаком?
Ова грешка указује на то да Стеам није могао да синхронизује ваше локалне датотеке са Стеам Цлоудом. То може бити привремени проблем са којим се можда суочавају сервери Стеам Цлоуд. Можете да проверите статус Стеам Цлоуд-а на веб локацији Стеам да бисте се уверили да је проблем на њиховој страни.

Ако је услуга клаузуле Стеам исправно покренута, значи да је проблем на вашем крају. Можете да проверите своју Стеам везу и решите проблеме. Такође можете да проверите да ли само имате проблема са синхронизацијом са Стеам Цлоуд-ом.
Ако занемарите поруку и кликнете на „Играј игру“, то може проузроковати потенцијални сукоб између локалних датотека и Стеам Цлоуд-а. То такође може резултирати изгубљеним напретком и подацима о играма.
Шта ако изгубим датотеку или напредујем након преласка на други рачунар?
Ако вам недостаје најновији напредак и још једном сте проверили да ли игра користи Стеам Цлоуд помоћу поставки, то значи да Стеам није могао успешно да синхронизује ваше податке или је синхронизација резултирала отпремањем ваших претходних података у Цлоуд.
Могуће је да је оригинална датотека или је напредак и даље на старијој машини и да није успео да се синхронизује. Могуће је ако покренете Стеам на том рачунару, показаће се ваш напредак. Ако се догоди, аутоматски ће се ажурирати на свим осталим машинама повезаним са вашим Стеам налогом.
Такође, многе игре не користе могућност Стеам Цлоуд-а. Можете да проверите званичну страницу игре ако је доступна подршка за Стеам Цлоуд. Ако није и немате приступ старијој машини, то значи да је ваш напредак изгубљен и нема начина да га опоравите.
Како избрисати датотеке сачуване на серверима Стеам Цлоуд-а?
Стеам Цлоуд се користи за израду резервних копија сваког напретка ваше игре, тако да не губите напредак ако приступите игри са било ког другог рачунара. Можете да потврдите да Цлоуд чува ваш напредак помоћу следеће методе.
Проверите да ли се ваша игра резервно копира.
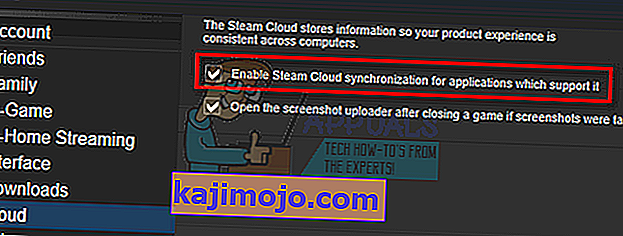
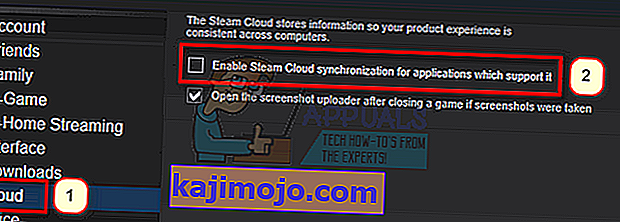
- Отворите Стеам клијент . Отворите његова подешавања притиском на дугме Стеам у горњем левом углу прозора и одабиром опције.
- Отворите картицу Цлоуд која се налази на левој страни екрана. Проверите да ли је потврђена опција „ Омогући Стеам Цлоуд синхронизацију за апликације које је подржавају “.
- Следећи клик на картицу Библиотека која се налази на горњој страни Стеам клијента. Овде ће бити наведене све ваше игре.
- Кликните десним тастером миша на игру и одаберите Својства . Затим идите на картицу Ажурирања која се налази на врху прозора.
- Овде у дну прозора видећете опцију „ Омогући Стеам Цлоуд синхронизацију за [име игре] “. Уверите се да је опција означена .


Ако су вам омогућене обе опције, то значи да резервну копију ваше игре врши Стеам Цлоуд и такође можемо избрисати податке.
Шта је резервни механизам?
Прво што бисте требали знати је да постоје три верзије сачуваних података о играма
- Оригинална верзија се чува у директоријуму АппДата ( Д1 ).
- Верзија у облаку чува се на локацији Стеам / усердата / СтеамИД / АппИД ( Д2 ).
- Верзија у облаку ускладиштена на Стеам-овим серверима у облаку ( Д3 ).
Запазите напомене (Д1, Д2, Д3) које смо користили, јер ћемо их убудуће пуно позивати.
Када игру започнете први пут, Д1 се аутоматски креира. Када завршите са играњем игре, подаци о игри се ажурирају у Д1 и аутоматски копирају у Д2. Након тога се Д2 синхронизује са Д3, преносећи тако сав садржај игре.
Ако игру први пут започнете са другог рачунара, ако Стеам има Д3 на својим серверима, али не препозна Д2 на рачунару, аутоматски ће преузети податке и копирати Д3 у Д2. Стеам Цлоуд такође аутоматски преузима податке који недостају кад год покренете Стеам.
Укратко, најважнији податак за нас је Д2. Ако можемо њиме манипулисати, можемо успешно избрисати податке које желите да избришете.
Напомена: Неке игре немају Д1 и своје податке директно чувају у Д2. Иако неке игре не користе Д2 као медиј и податке преносе у Цлоуд директно са Д1.
What Are the Userdata Contents?
In the directory Steam/userdata, you should have a folder corresponding to your SteamID (You check what your Steam ID is by reading our article on it). After you open it, there will folders made for each game that you play. They will be identified using their AppID (AppID can be easily checked by visiting the game in the Steam store and extracting it from the URL). In this game folder, you will find two entities.
- remotecache.vdf: This file describes all the properties of files that are contained in the remote folder.
- Remotefolder. This contains all the files which are synced with your Steam Cloud server.
Deleting Data from Cloud
In this method, we will be following two important steps. We will first bring up the Steam Cloud conflict notification and then delete the Cloud files.
Do note that you would have to follow these steps game by game to delete all of the Steam cloud content.
First, we need to delete the AppID folder from your Steam directory. After you restart your computer and Steam, Steam will automatically re-create the folder. We need to perform this step to ensure that the Steam Cloud is working perfectly and we can go ahead with the part of deletion.
- Open your Steam directory. The default location for your Steam installation is
C:\Program Files (x86)\Steam
- Search for a folder of AppID and Delete it. Then restart your computer and Steam. Start a game for a few minutes. Make sure that you have a working internet connection.
- Navigate back to the Steam directory and check if the AppID folder is back. If it is, it is confirmed that your Steam Cloud is working perfectly and we can proceed with the method.
Bringing Up Steam Cloud Conflict Dialogue
The first part of the solution is probably the most difficult. To delete all your Steam Cloud data, it is necessary to bring the conflict dialogue. Without it is not possible to delete the data present in your Cloud. Steam Cloud conflict occurs when the Cloud files differ from the data present on your hard drive.
There are two methods to bring about this conflict:
Method 1:
- Make sure that your Steam Cloud is enabled by following the steps mentioned above. Exit Steam completely by ending all the processes starting with Steamclientbootstrapper using the task manager.
- Now will alter all the files in the location
Steam\userdata\SteamID\AppID\remote
The objective is to make sure that all the files are different from those uploaded to the Steam cloud. We can’t simply delete the files from this location as Steam will automatically notice that the files are missing and download the same ones from the Cloud servers. We can achieve our task by corrupting them and making them 0-byte files.
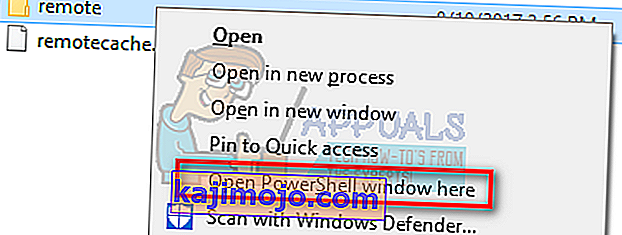
- Navigate to
Steam\userdata\SteamID\AppID\remote
- Now hold shift and right-click on your remote folder. Select the option “Open PowerShell window here”.
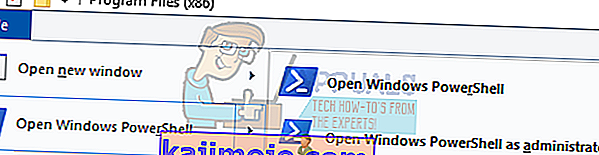
- You can also open PowerShell when in the folder by clicking the File option present at the top left side of the screen and selecting “Open Windows PowerShell as administrator”.
- Once PowerShell is opened, type the exact text written below


clc –path “C:\Program Files (x86)\Steam\userdata\SteamID\AppID\remote\*"
If you fail to write the correct code, you will get an error like this

If you correctly type in the line there will be no confirmatory message and you will get a window like this.

Start your Steam and there will be the conflict windows present on your Steam client.
Method 2:
This is an easier method as compared to the earlier one but it isn’t that efficient.
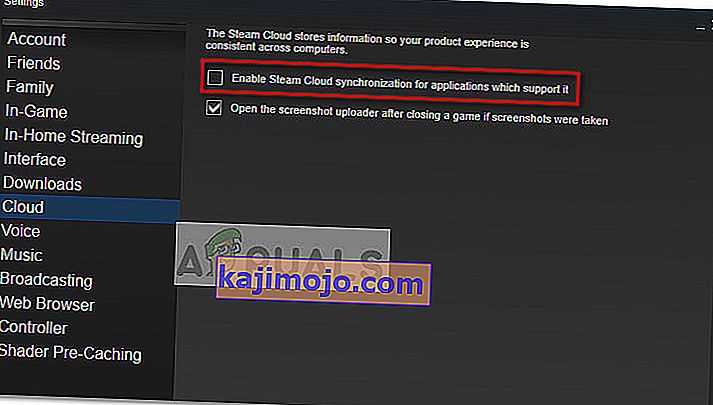
- Open your Steam client. Open its Settings by pressing the Steam button present at the top left corner of the window and selecting the option.
- Open the Cloud tab present on the left side of the screen. Uncheck the option “Enable Steam Cloud synchronization for the applications which support it”.

- Now navigate to your Stream directory as you did earlier and delete all files present in the folder of AppID. The file path for deletion is
Steam\userdata\SteamID\AppID.
- Now start the game to make new and different files in the file location.
- Exit the game and Steam completely by ending all Steam processes in the task manager (end steamclientbootstrapper first).
- Now delete the remotecache.vdf file present in the location
Steam\userdata\SteamID\AppID
- Start your Steam.
- Head over to the client’s Settings and enable the cloud.

Now a Steam conflict dialogue will come forth and we can proceed with the remaining method.
Deleting Cloud files
Once the Cloud conflict error is forth, don’t click any option and follow the instructions below.
- Navigate to the following file path
Steam\userdata\SteamID\AppID
and delete all the files in it. There will be two files (remote folder and remotecache.vdf). Delete both of them.

- Now go back to the conflict window and select the option of “Upload to the Steam Cloud”. Now Steam will sync your AppID folder while there will be nothing in it and the previous data on your Steam Cloud will be deleted.
- Now the game will start automatically but it will create new files that will be synced to your Steam cloud when you close it. We can prevent it from happening by pressing alt + tab. This will open the open windows on your screen. Select the Steam client from the list of windows.
- Once you are in the Steam client, open the client’s Settings. Navigate to the Cloud tab and uncheck the line which enables cloud.
- Now return to the game and exit. No files will be synced to your Steam cloud.
- Exit Steam and delete the AppID folder as we did before.


How to Make Sure If it Worked?
Remember how we checked at the beginning of this method if the Steam Cloud was running as expected by deleting the AppID folder and checking if it was made again. If there is no file present in the Steam cloud, there will be no file downloaded to your computer.
- Enable the Steam cloud as we did in the guide.
- Exit Steam completely by using the task manager.
- Delete the AppID folder (if you didn’t in step 2).
- Now check D3 (these are the cloud files) and compare them with D2 (local files on your computer). If there is nothing in D3, there will be nothing in D2 too!
- Check the following directory Steam\userdata\SteamID
No new AppID folder would have been created.
You can also check by logging Steam in on another computer and checking if the files exist.
If you make it till here without any problems, you have successfully deleted all the files on your Steam Cloud.
How to Delete Steam Cloud Saves from OS X
The procedures above can also be replicated on OS X and older Macs to a slight extent. By following the steps below, you will be able to delete your local saves. You can then disable the Steam Cloud synchronization from the Steam application, start a new game and create a few new saves. Then, when you return to re-enable the Steam Cloud synchronization features, the client will ask you which saves do you want to use. You can then choose the new ones which will delete and replace your old saves from the cloud.
To make things even clearer, here’s a step-by-step guide through the whole thing:
- Open your Steam application and go to Steam > Settings via the ribbon at the top of the window.
- In the settings menu, click on the Cloud tab and uncheck the box associated with Enable Steam Cloud synchronization for applications that support it.
- Close Steam completely and open your Finder app.
- Go to Library > Application Support > Steam > SteamApps > Common and open the folder of whichever game you want to delete the save files.
- Next, open the SAVE folder to reveal the saves of the game.
Note: If the location specified above doesn’t land you to the save files, try the following locations but mind the placeholders:
Users / *Your username* /Library / Application Support / *Game Folder* / Game Documents / *Game* / GameSaves Users/ *Your username* / Library / Application Support / Steam / userdata / *GameNumber* / remote Users/ *Your username* / Library / Containers / *Game Folder* / Data /Library / Application Support / *Game* / GameDocuments / *Game* / gamesaves
- Once you manage to identify and delete the local saves from the game you’re targeting, open the Game and create a few new saves.
- Exit the game, open steam and return to Steam > Settings > Cloud. From the cloud tab, re-enable the checkbox next to Enable Steam Cloud synchronization for applications which support it and click the OK button below.
- Steam will ask you whether you want to use the newly created local saves or the ones that you already have on the cloud. Choosing to use the new ones will delete the old saves that you currently have on Steam Cloud.