Many users came across the problem where they were unable to launch various applications that have ties to explorer.exe such as Outlook, Edge, Internet Explorer, Windows Explorer, and even the Start Menu.

The error usually occurs when the system files of ‘explorer.exe’ are corrupt or there is some wrong configuration. Your system files may also be corrupted as there were users who reported that due to virus/malware, their antivirus software deleted the associated antivirus files along with some system files as well which caused the error. We have outlined various fixes for you to solve the problem. Start with the first solution and work your way down accordingly.
Solution 1: Restart Windows Explorer
A simple and one of the easiest workaround is to restart the Windows Explorer using the task manager. This will reset all current configurations of the process and reset it/
- Press Windows + R to bring up the Run Type “taskmgr” in the dialogue box to bring up your computer’s task manager.
- Click the “Processes” tab located at the top of the window.
- Now locate the task of Windows Explorer in the list of processes. Click on it and press the “Restart” button present at the bottom left side of the window.

Solution 2: Disable Internet Explorer 11
Another workaround that solved the issue was disabling Explorer 11. Do note that you will require administrator access to follow this solution and your computer might take some time on your next boot in initializing some services. Be patient and let Windows take its time.
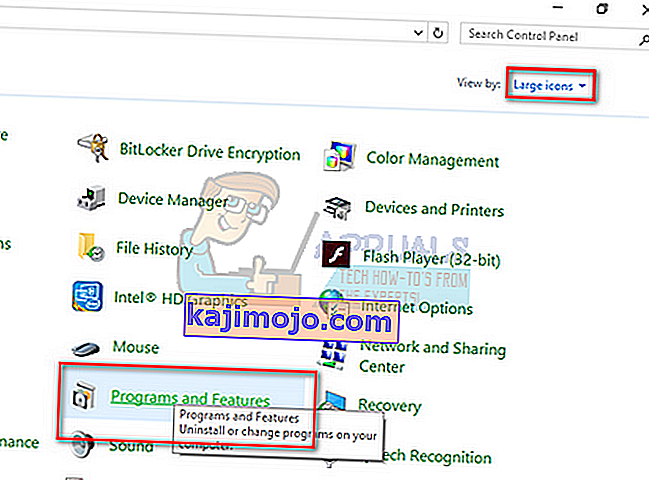
- Press Windows + R, type “control panel” and press Enter.
- Once in the control panel, select the option “View by Large icons” present at the top right side of the screen and select the subcategory “Programs and Features”.
- Now select “Turn Windows features on or off” option present at the top-left side of the window .

- Uncheck the feature “Internet Explorer 11”. A UAC will pop up asking you to confirm your actions. Press “Ok” and restart your computer.
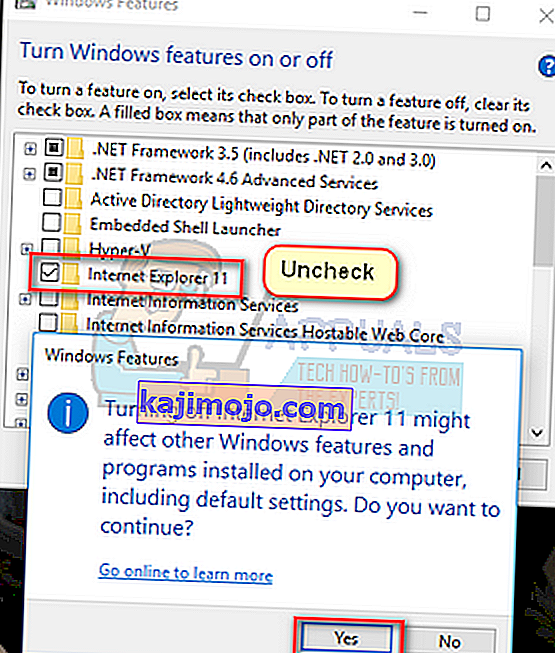
- Windows might need a little time on the next reboot. Be patient and let the process finish.


Note: You might also be required to perform a short update so make sure you have an active internet connection.
Solution 3: Launch Edge from App Listing
Another short workaround if you can’t have Edge to run is to re-run the Edge application from the application listing. We will avoid using all the shortcuts in this method. It is a wild shot but since it worked for some PCs, it might work for yours as well.
- Click on the “Start” button on your keyboard or click the Windows logo present at the bottom left side of the screen to open the start menu.
- Click on “All apps” to launch the listing on the applications (including the default ones).

- Now search for the application through the list. Click it to launch and see if there are still any discrepancies present.


Solution 4: Set Edge as a Default Program
Another workaround if you get the error under discussion when you are opening Edge to set it as a default program. The majority of the users have some other application set (such as Chrome). It seems that there are some functionalities present that are related to this feature. You can always revert the changes using the same method if this doesn’t work for you.
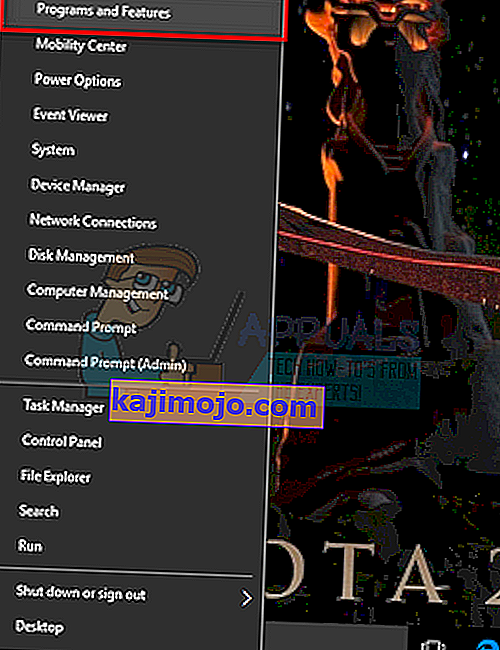
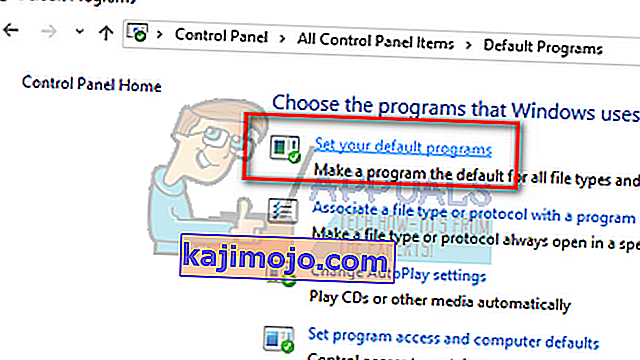
- Right-click on the Start menu and select “Programs and Features” from the list of options present.
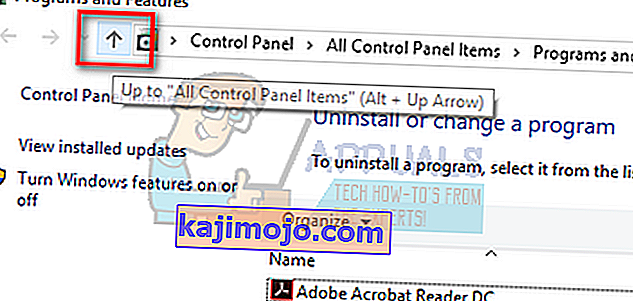
- Now click on the “Up arrow” present near the address bar of the window.
- Now click on the “Default Programs” sub-category from the list present.
- Next select “Set your default programs” so we can make the necessary changes.
- Search for “Microsoft edge” using the left navigation pane and click on “Set this program as default”.
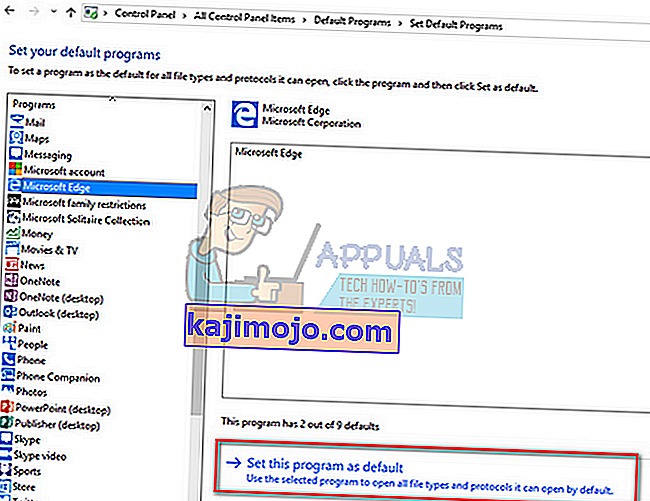
- Click “OK ” to save changes and restart your computer. Now check if the problem persists.


Solution 5: Run System File Checker
System File Checker (SFC) is a utility present in Microsoft Windows which allows the users to scan their computers for corrupt files in their operating system. This tool has been there in Microsoft Windows since Windows 98. It is a very useful tool for diagnosing the problem and checking if any problem is due to corrupt files in windows. We will also run the DISM command if the SFC is unable to fix some errors indicated.
- Press Windows + R to launch the Run application. Type “taskmgr” in the dialogue box and hit Enter to launch your computer’s task manager.
- Now click on File option present at the top left side of the window and select “Run new task” from the list of options available.

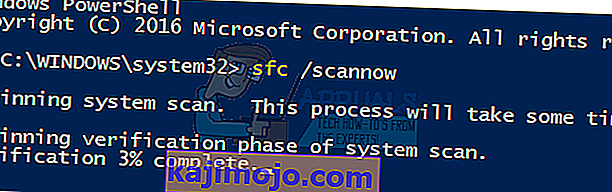
- Now type “PowerShell” in the dialogue box and check the option underneath which states “Create this task with administrative privileges”.
- Once in the Windows Powershell, type “sfc /scannow” and hit Enter. This process may take some time as your entire Windows files are being scanned by the computer and being checked for corrupt phases.
- If you encounter an error where Windows states that it found some error but was unable to fix them, you should type “DISM /Online /Cleanup-Image /RestoreHealth” in the PowerShell. This will download the corrupt files from the Windows update servers and replace the corrupt ones. Do note that this process can also consume some time according to your internet connection. Don’t cancel at any stage and let it run.


Solution 6: Disable/Uninstall Antivirus Applications
Another interesting phenomenon that was observed was that it seemed many antivirus applications were seen interfering with the operating system and were the root of the problem. Also, your antivirus software may have quarantined some specific directories in which system files are present. Some of these antivirus applications include Panda, AVG, etc. Also, if you are using the StartIsBack application, then uninstall it.
You should disable all antivirus applications. You can temporarily disable them or if they don’t have that function, consider uninstalling them (only if you have the product key and have access to the installation package). You can also check our article on how to Disable Avast Antivirus Temporarily.
Note: Please disable the antivirus at your own risk. This article is for information purposes only. Appuals will not be responsible for any damage done to your computer in case of being infected with malware/virus.
Solution 7: Disable iCloud and its Services
There were some reports which indicated that the error message is also caused by the application iCloud. There is a history of this application conflicting with the Windows operating system. You need to disable it being run at startup using the task manager and close all its related processes. You can always revert the changes using the same method if this doesn’t work as expected.
- Press Windows + R, type “taskmgr” in the dialogue box and press Enter.
- Click on the “Startup” tab and look for iCloud from the list of processes. Right-click it and select “Disable”.
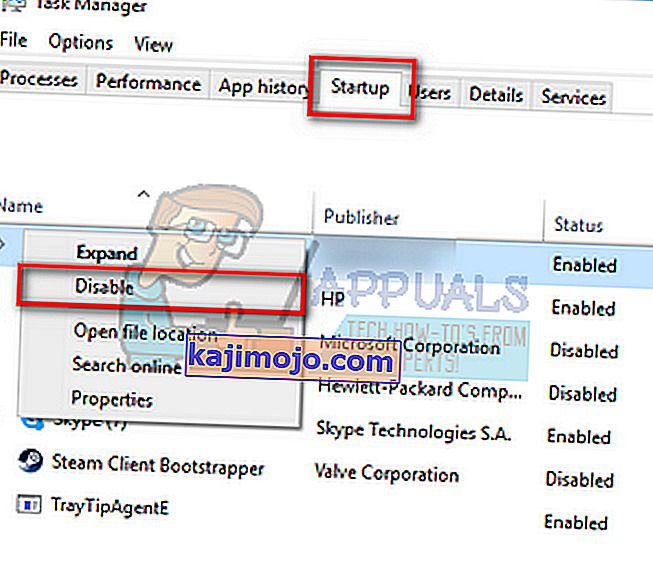
- Restart your computer and check if the problem at hand got solved.

Note: Also try ending all iCloud processes running at any instant using the task manager.
Solution 8: Install the Latest Windows Updates
Windows roll out important updates targeting the bug fixes in the operating system. If you are holding back and not installing the Windows update, we strongly recommend that you do. Windows 10 is the latest Windows operating system and new operating systems take a lot of time to get perfect in every regard.
There are a lot of issues still pending with the OS and Microsoft rolls out frequent updates to target these issues.
- Press the Windows + S button to launch your start menu’s search bar. In the dialogue box type “Windows update”. Click the first search result which comes forward.

- Once in the update settings, click on the button which says “Check for updates”. Now Windows will automatically check for updates available and install them. It may even prompt you for a restart.
- After updating, restart your computer and check if your issue got fixed.

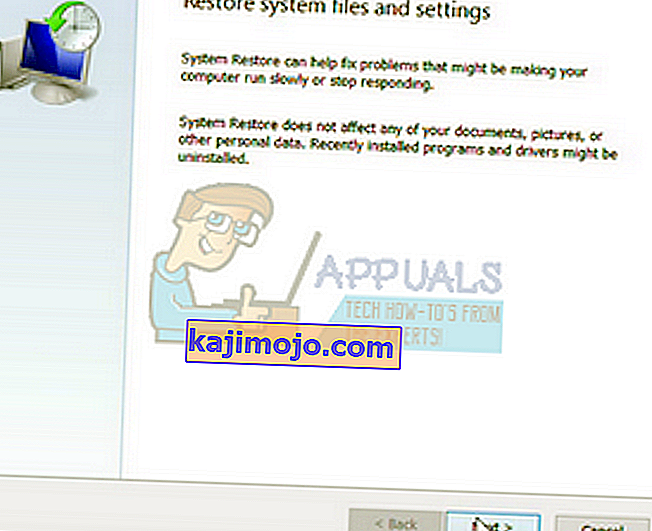
Solution 9: Perform a System Restore/Do a Clean Install
If all the above methods don’t work, we are left with no choice but to restore Windows to the last restore point. If you don’t have the last restore point, you can install a clean version of Windows. You can use the utility “Belarc” to get all your licenses saved, backup your data using external storage and then perform a clean install.
Note: Make sure to back up your data before performing this solution. Use an external hard drive or USB to save all your important files just in case.
Here is the method on how to restore Windows from the last restore point.
- Press Windows + S to launch the start menu’s search bar. Type “restore” in the dialogue box and select the first program which comes in the result.

- Once in the restore settings, press System Restore present at the beginning of the window under the tab of System Protection.

- Now a wizard will open navigating you through all the steps to restore your system. Press Next and proceed with all the further instructions.
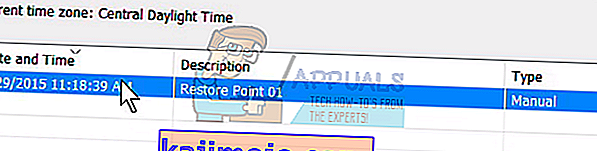
- Now select the restore point from the list of options available. If you have more than one system restore points, they will be listed here.
- Now windows will confirm your actions for the last time before it starts the system restore process. Save all your work and backup important files just in case and proceed with the process.

- Once you have restored successfully, log into the system and check if the error at hand got fixed.


Solution 10: Tweaks with The ExplorereFrame.dll file
Explorerframe.dll is the file that contains many of the resources that are used by explorer.exe. These resources include bitmaps, icons, menus, etc. If this file is not registered (due to a software glitch) or gets corrupted then it can cause the current explorer.exe error. In that case, re-registering the ExplorerFrame.dll may solve the problem.
- Click on the Windows button (in the lower-left corner of your screen), type Command Prompt and in the search results displayed, right-click on Command Prompt and click on Run as Administrator.
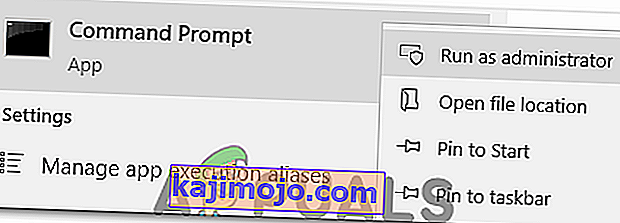
- If UAC prompts, click Yes.
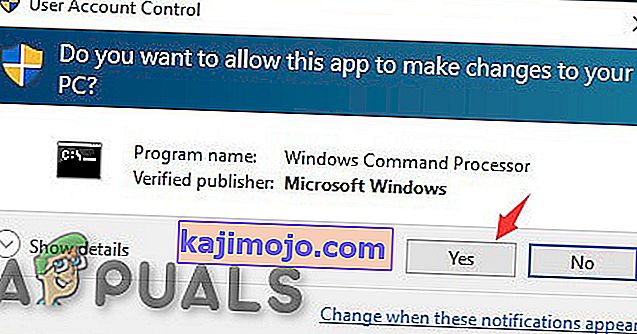
- In Command Prompt, type
regsvr32 ExplorerFrame.dll
and press Enter.
- Сада поново покрените систем и проверите да ли је проблем екплорер.еке решен.
- У супротном, можете копирати ЕкплорерФраме.длл са другог Виндовс оперативног рачунара или са Интернета (није препоручљиво) и налепити га у проблематични систем. Пут за копирање и лепљење ЕкплорерФраме.длл је
Ц: \ Виндовс \ Систем32 и \ СистемВОВ64


Решење 11: Отворите још један налог локалног администратора
Сваки кориснички налог у оперативном систему Виндовс има специфична подешавања и преференције за апликације и друге системске опције. Ако је ваш локални Виндовс профил / рачун оштећен, то може бити разлог за „Класа грешке није регистрована“. У том случају проблем може да реши стварање новог корисничког профила / налога. Имајте на уму да ће ово уклонити све тренутне поставке са вашег налога и да ћете их морати поново подесити.
- Направите нови локални кориснички рачун / профил за Виндовс.
- Сада проверите да ли можете да користите систем без икаквих проблема. Ако можете, размислите о премештању свих корисничких подешавања на нови налог.

Решење 12: Ресетујте Виндовс
Ако вам до сада ништа није помогло, ресетовање Виндовс-а може решити проблем. Виндовс 10 има функционалност која омогућава корисницима да ресетују систем на подразумеване поставке, уклањајући све апликације / управљачке програме које је корисник инсталирао. Не брините за своје датотеке, имат ћете могућност да их сачувате или уклоните.
- Ресетујте Виндовс.
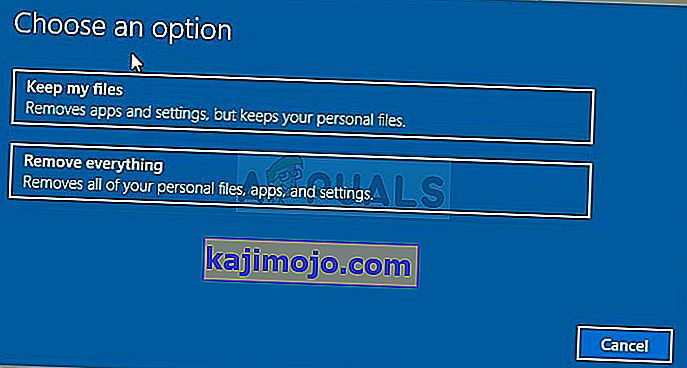
- Сада проверите да ли је у вашем систему уклоњена грешка у вашем рачунару која није регистрована.

Ако немате ниједну тачку враћања или ако враћање система не функционише, можете да инсталирате Виндовс чисто помоћу медијума за покретање. Проверили сте наш чланак о томе како да направите медиј за покретање . Постоје два начина: коришћењем Мицрософтовог алата за стварање медија и коришћењем Руфуса.